Cracking in the cloud with Hashcat – A how to…
So first up, this post came about from a discussion with another tester centering around whether using a cloud based platform is a worthwhile venture for real-time and offline password/hash decrypting i.e. cracking.
After a quick search on the pentesters best friend, Google, it leads my colleague and I to a variety of different write-ups covering both technical details and set-up guides. Two of the best we came across can be found at the following links:
Myself and my colleague are in no way taking credit for their work and are in no way trying to rehash what they have already done.
So, why do the write up then? Well, we decided to write this post due to the fact, that out of all the walk-throughs, the above blog posts were the closest to a ‘condensed deployment solution’; however, we ran into problems with both while trying to set them up. We’re not sure why we were not able to follow either guide completely to the end, but suffice to say that we couldn’t, changes to AWS EC2 instances seem the most likely option. So, we decided to document our set-up process with the view that it may help others.
Now for the boring but serious part…
Disclaimer: The following guide is for educational and research purposes only. You should never use these types of services, either physical or digital, for illegal purposes or to decrypt a password/hash without legal authority or consent of the owner. You have been warned!
AWS Account Registration
You’ll need to set-up an AWS account (assuming you don’t already have one). This bit has to be done prior to setting up an instance and you are required to supply debit/credit card details in advance for billing purposes. No getting round it folks!
This is pretty much the longest part of the set-up, as it can take upto 24hrs for your account to be approved and access to the services the AWS console provides granted.
Once you receive your confirmation email you’re good to go! If you’re new to AWS it is worth the time to read over some of the introductory information and familiarise yourself with how the dashboard works and the options you have available.
It is worth noting that this EC2 instance is NOT ELIGIBLE for the ‘free tier’ service that AWS offer. The type of instance we will set up and deploy will incur charges! So be mindful of this, the charges are per hour of use! Even if you do not actively use the instance for cracking but leave it running in the cloud, you will be charged! Always stop this type of instance after use… You have been warned and we take no responsibility for any charges you may incur while following this guide!
So you know in advance the type of cost you may incur… These will be PER HOUR while running/active…
More in-depth information cane be found HERE
Launching Our Instance
Launching an instance is relatively easy. Though what’s not initially clear to AWS users is that fact that you have a default instance limit of ‘0’, meaning you cannot access certain features and benefits that AWS can offer.
So, we need to get this instance limit amended from ‘0’ to ‘1’ which will grant us access to the high end features which offer GPU assistance. This is exactly what we need to enable Hashcat to perform its cracking duties.
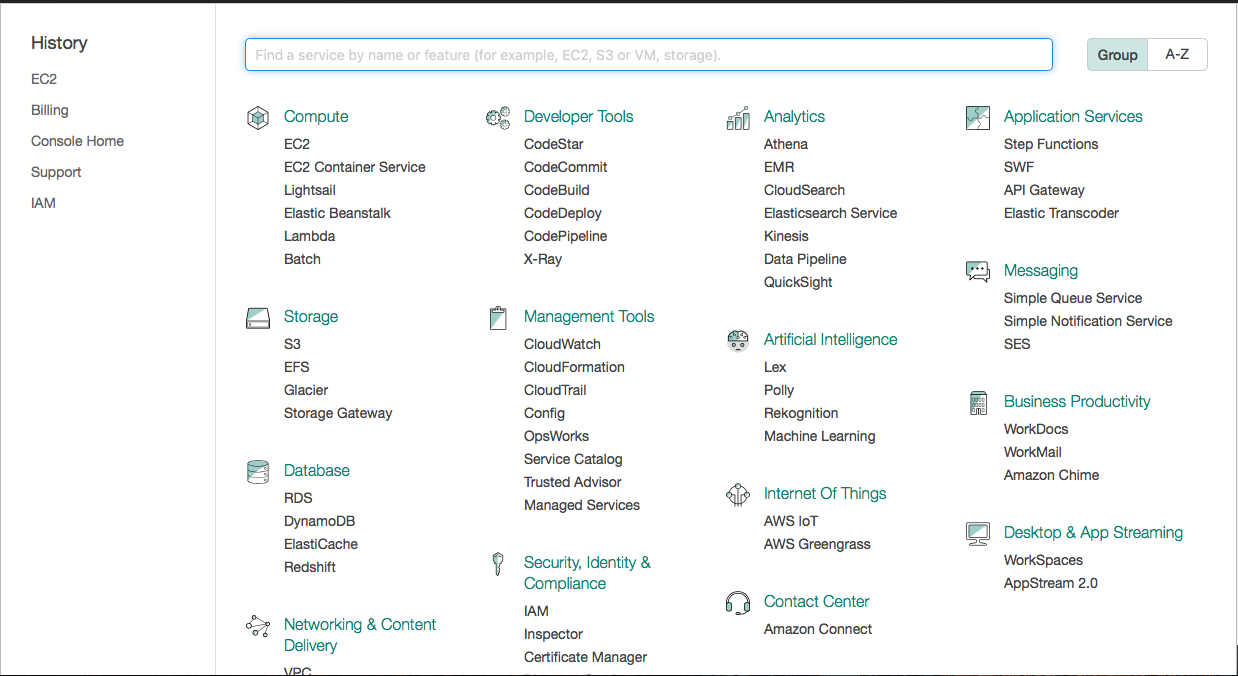
Once you’re logged in you should be greeted with the ‘Services’ or the ‘EC2 Dashboard’ home screen.
If you land on the ‘Services’ page, look for the ‘Compute’ heading, then select ‘EC2’.
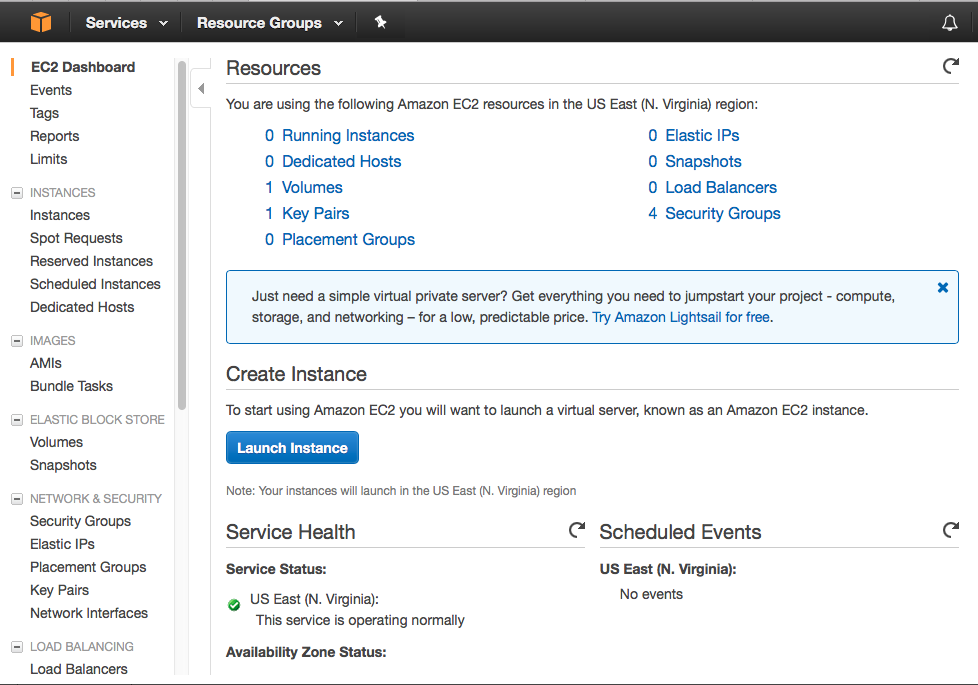
If you land on the ‘Dashboard’ page, then it will look for this…
To generate our support case to have our default instance increase request completed we can do the following:
- Click on the support drop down
- Select create case
- Regarding: ‘Service Limit Increase’
- Limit Type: EC2 Instances
- Supply a justification (we were honest and advised it was for security research)
- Contact method: Phone (The web option took forever, so we resubmitted the support case via using the phone contact method.
- You’ll receive a call to clarify some stuff, and then you wait.
Once you get the AWS ‘OK’ and have confirmation your limit will be increased your good to go! Now we need to set about launching our instance…
Ultimately you are looking for the ‘Launch instance’ button on the ‘EC2 Dashboard’ screen.

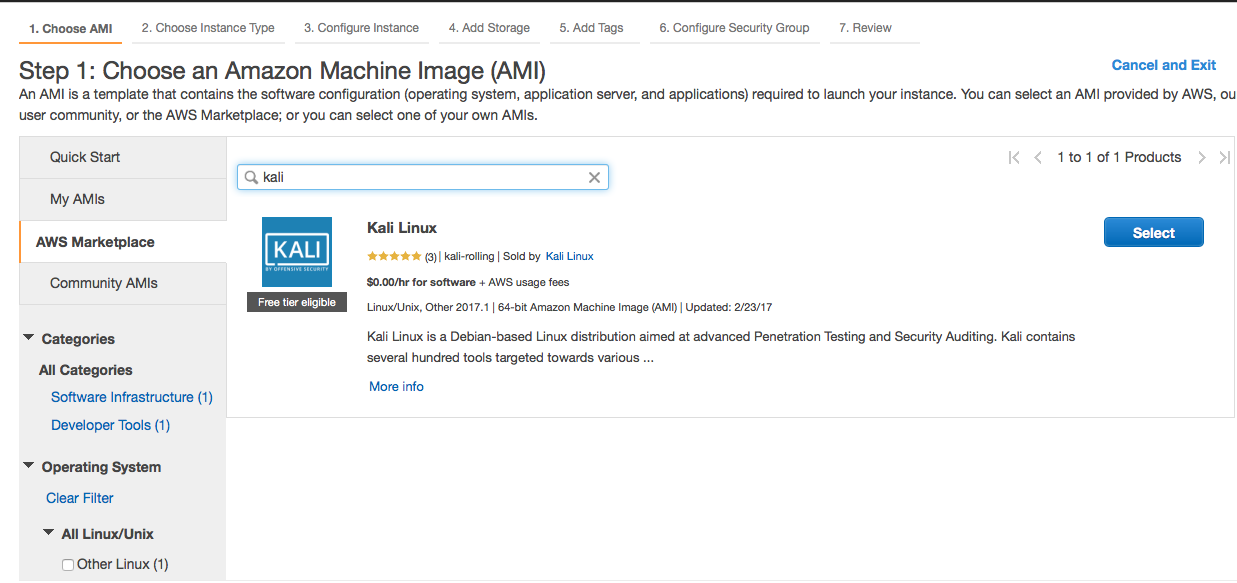
Once you have used the ‘launch instance’ option you’ll be greeted with an option to choose your ‘Amazon Machine Instance’ (AMI).
During our set-up efforts and as mentioned in the Blackhills blog post, the quickest and easy way to get set up was by using the Offensive Security AWS Kali image.
To do this we need to select ‘AWS Marketplace’ and enter ‘Kali’ into the search bar and then click on ‘select’.
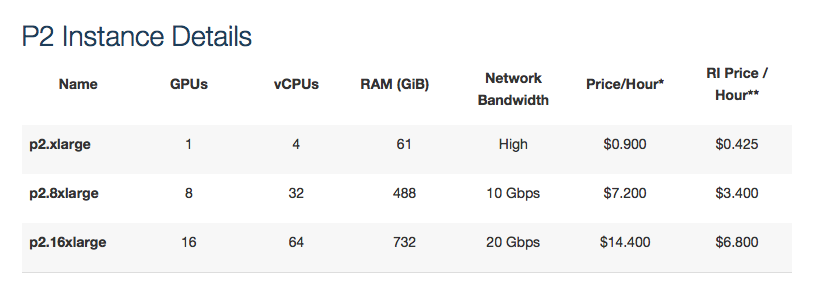
Next you’ll need to run through the set up, ensuring you have selected the relevant ‘P2’ instance type. There are three (3) to choose from:
Again, be mindful of which instance you pick! We opted for the ‘p2.8xlarge’ which costs $7.20 per hour! The ‘p2.16xlarge’ sounds great but at $14.40 per hour, you better have deep pockets if you go for that option!!!
Note: These prices are subject to change and were correct at the time of writing.
After this you need to go through the rest of the configuration steps. We’ll leave that up to you to work through. Though as a pointer, we accepted most of the defaults apart from the following:
-
Storage. Basically we ran out of disk space real quick!! What wasn’t clear to us at the time of set up was that the Kali OS requires a part of the overall storage allotted to the instance. The storage wasn’t in addition to any OS requirements. This maybe apparent to other season AWS users but it wasn’t to us and therefore we ran into a snag further down the line when we tried to upload/wget large wordlist files. Allocate a large enough storage device that will be sufficient for your needs this will save time down the line, although the storage is ‘elastic’ and can be amended later if you forget!
-
Security Group. Unless you want this instance accessible to the public domain. Bear in mind the type of OS that we have used, the tools it has and the consequences they could cause if your instance was breached and used maliciously. We would suggest that you lockdown access to whatever your IP address is and allow access from that IP address only. Your connection will be via SSH TCP port 22. To do this configure the security group settings and under ‘Source’ select ‘My IP’. This will auto-populate your public IP address.
Connecting to your Instance
Once all the settings have been set, click the ‘Review and Launch’ button. You will receive a warning about ‘your instance is not eligible for the free-tier’ which you are prompted to acknowledge, do so. Then click ‘Launch’
At this stage you’ll be prompted for to set up a ‘Key pair’ to enable secure access to your instance:

Note: Your key is only as safe as the place you store it!!
Once you have set-up your key pair, your instance will begin to be built, once built it will begin to start automatically. From here you will start incurring charges until you stop the instance!
At this point, it is worth highlighting that myself and Nick used a combination of nix hosts to carry out the set-up (Linux and OSX). These OS’s allow native command line access without the need for additional software/programs. If you are following along but using a windows host as your base, then a few additional steps need to be taken prior to accessing your instance:
- You’ll need to use PuTTY as your SSH client (download and install if you don’t have it)
- Import the AWS ‘you-key.pem’ file into PuTTY
- Save the file
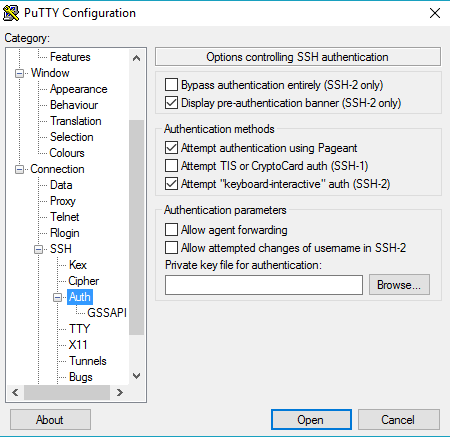
Note: To connect using PuTTY after importing your key several options need to be selected under the PuTTY ‘SSH Auth’ menu.
Connecting via Linux/OSX is relative simple. Just open up a terminal, then go back to the ‘EC2 Dashboard’, select the ‘Connect’ option, which should bring up this pop up:
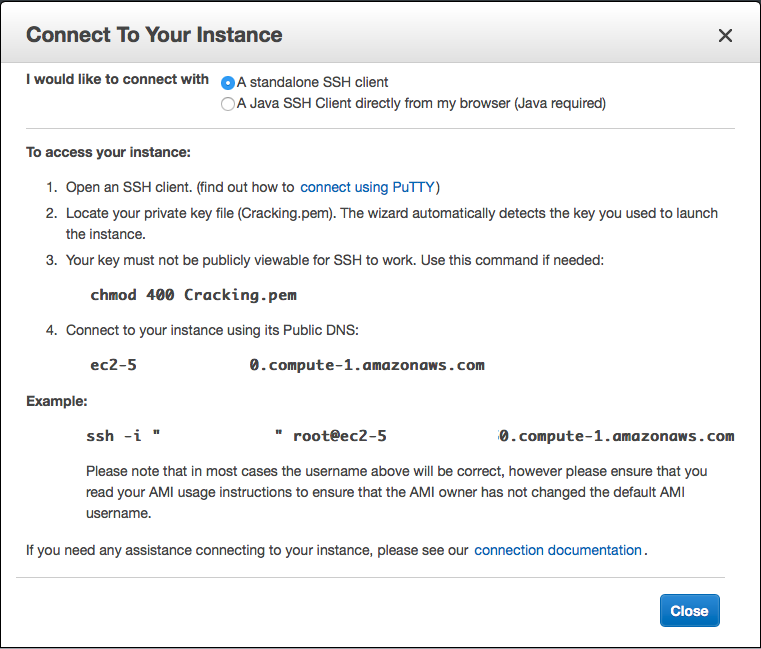
One thing to note is that the Kali instance or potentially a AWS security feature prevents ‘root’ login and the SSH command specified will fail. Edit the command and replace ‘root@’ with ‘ec2-user@’. Example:
ssh -i "your.pem" ec2-user@ec2-your-aws-instance-ip-address.compute-1.amazonaws.com
Note: After stopping your Cracking instance and restarting it, your instance will be assigned a new IP address. You’ll need to check this and amend your SSH command in your terminal or PuTTY before you are able to SSH into the instance again.
Updating our cracking Instance
As we are using the OffSec EC2 Kali Linux instance, a lot of the repo’s we need are already installed by default, but lets update these using the following linux command (it may take a while, time for a coffee?):
apt update && apt upgrade -y
Note: The ‘&&’ chains the command together and the ‘-y’ accepts any requirements.
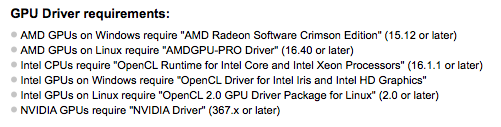
The GPUs we have access to are the following:

Note: The Teslak80 GPU’s aren’t specifically optimised for Hashcat or GPU cracking, though they remain a viable option
The Hashcat website advises we need to use the follow Nvidia Driver when using Nvidia GPUs:
Setting up Hashcat
This part, neither myself nor nick can take any credit for, when it comes to setting up Kali to run with Hashcat and our Teslak80 Nvidia GPUs. After much writing and ‘Googling’, we kept coming back to the same things and to be honest we couldn’t have written the breakdown any better ourselves! So with that in mind we give full credit to the breakdown as written by ‘N0ur5’:
Before we install any new NVidia driver we need to blacklist (or disable) the default Nouveau open source driver. This is so we don’t have conflicting drivers.
To blacklist the Nouveau drivers we are going to create a configuration file with the options to make that happen.
cd /etc/modprobe.d/
The command above will get us into the proper directory. Next we need to create the file. We can do so in Nano.
nano blacklist-nouveau.conf
We now have a blank file we can edit opened in Nano. Add the following text to the file:
blacklist nouveau
blacklist lbm-nouveau
options nouveau modeset=0
alias nouveau off
alias lbm-nouveau off
To save this file use ‘crtl X’ and the ‘crtl O’.
Next, the final steps to taking the Nouveau driver out of order.
echo options nouveau modeset=0 | sudo tee -a /etc/modprobe.d/nouveau-kms.conf
update-initramfs -u
Once this is done installing lets reboot by issuing:
reboot
Connect back to your EC2 instance after it shows up as running again in the AWS console and log in again (remembering to check the new IP address). Now we need to fine tune GPU’s.
nvidia-smi -pm 1
nvidia-smi -acp 0
nvidia-smi -ac 2505,875
nvidia-smi– SMI stands for System Management Interface, it is a set of options we can configure on our nVidia GPU’s, among other management and monitoring settings.
pm 1– Persistence mode = 1, Enables Persistence mode which minimises driver load latency by keeping it loaded even when not in use. Resets to “0” or “off” when machine is rebooted
acp 0– Applications-Clocks-Permission = 0, Sets Applications Clocks Permission to “Unrestricted”
ac 2505, 875– Specifies maximum memory and graphics clocks.
Hashcat Benchmark
Ok, so now we have updated, configured and rebooted everything for it all to take effect, lets see if we can get some benchmark results!! To do this, We can issue the following command in our terminal:
hashcat --benchmark
Note: When running the Benchmark test, we did encounter a ‘Cuda Compatibility’ error which outputted on the terminal screen, however the benchmark completed successfully. We are still looking into what the exact compatibility error is…
This will benchmark pretty much everything and will most likely take a while! If you’ve followed along and your instance is live, you will be being charged money!!
It is worth keeping in mind the following when trying to make sense of the benchmark output:
H/s == Hashes per second
KH/s == Kilohashes per second (Thousands of hashes per second)
MH/s == Megahashes per second (Millions of hashes per second)
MD5
Hashtype: Half MD5

Speed.Dev.#1.....:  3049.9 MH/s (71.47ms)
Speed.Dev.#2.....:  3091.3 MH/s (70.51ms)
Speed.Dev.#3.....:  2938.3 MH/s (74.19ms)
Speed.Dev.#4.....:  3173.7 MH/s (68.68ms)
Speed.Dev.#5.....:  2918.6 MH/s (74.69ms)
Speed.Dev.#6.....:  3138.9 MH/s (69.44ms)
Speed.Dev.#7.....:  3064.1 MH/s (71.14ms)
Speed.Dev.#8.....:  3125.5 MH/s (69.72ms)
Speed.Dev.#*.....: 24500.2 MH/s
NTLM
Hashtype: NTLM

Speed.Dev.#1.....:  8195.2 MH/s (53.19ms)
Speed.Dev.#2.....:  8397.3 MH/s (51.90ms)
Speed.Dev.#3.....:  7930.3 MH/s (54.96ms)
Speed.Dev.#4.....:  8268.1 MH/s (52.72ms)
Speed.Dev.#5.....:  7688.1 MH/s (56.68ms)
Speed.Dev.#6.....:  8515.2 MH/s (51.18ms)
Speed.Dev.#7.....:  8073.4 MH/s (53.99ms)
Speed.Dev.#8.....:  8756.9 MH/s (49.77ms)
Speed.Dev.#*.....: 65824.6 MH/s

Hashtype: NetNTLMv2

Speed.Dev.#1.....:   298.4 MH/s (91.33ms)
Speed.Dev.#2.....:   294.6 MH/s (92.51ms)
Speed.Dev.#3.....:   291.3 MH/s (93.55ms)
Speed.Dev.#4.....:   294.6 MH/s (92.52ms)
Speed.Dev.#5.....:   293.5 MH/s (92.83ms)
Speed.Dev.#6.....:   294.8 MH/s (92.43ms)
Speed.Dev.#7.....:   297.5 MH/s (91.59ms)
Speed.Dev.#8.....:   295.4 MH/s (92.24ms)
Speed.Dev.#*.....:  2360.2 MH/s
WPA2
Hashtype: WPA/WPA2

Speed.Dev.#1.....:    92251 H/s (70.35ms)
Speed.Dev.#2.....:    93328 H/s (69.54ms)
Speed.Dev.#3.....:    89635 H/s (72.42ms)
Speed.Dev.#4.....:    91501 H/s (70.94ms)
Speed.Dev.#5.....:    89356 H/s (72.64ms)
Speed.Dev.#6.....:    93818 H/s (69.18ms)
Speed.Dev.#7.....:    91415 H/s (71.00ms)
Speed.Dev.#8.....:    91367 H/s (71.04ms)
Speed.Dev.#*.....:   732.7 kH/s
Note: In-depth Benchmark output will be posted in a separate blog post.
Hash files, dictionaries and Wordlists
Now that Hashcat is up and running and we have our benchmarks recorded. The next order of business would be to upload any hash files, dictionaries and wordlists you will want to make use of!
As mentioned earlier, this is where setting the storage option in advance will come in handy. We initially chose 30GB of storage, what we had over looked in our hast is that a lot of the dictionaries/wordlists we use can be in excess of this limit! We needed to go back and amend the storage associated with the instance; it was no big deal, but will save you a job later down the line if you factor this in at the start! Now the storage issue has been cleared up, its on to getting files on to our ‘cracking’ instance!
To get files on to the box we have 2 options (Linux/OSX):
- SCP: SCP copies files between hosts on a network. It uses ssh for data transfer, and uses the same authentication and provides the same security as ssh. scp will ask for passwords, passphrases or key files if they are needed for authentication.
Note: For Windows users, download and use ‘Winscp’.
AWS SCP Upload Command:
scp -i "your-key.pem" ~/Path/to/your/file [email protected]:/home/ec2-user
AWS SCP Download command:
$scp -i "your-key.pem" [email protected]:~/Path/To/output-file.txt ~/Download/
With these commands you will be able to easily upload/download any files you wish.
- Wget: GNU Wget is a free software package for retrieving files using HTTP, HTTPS and FTP, the most widely used Internet protocols. It is a non-interactive commandline tool, so it may easily be called from scripts, cron jobs, terminals without X-Windows support, etc.
WGET example command:
wget https://crackstation.net/files/crackstation.txt.gz
This command will reach out to the remote server and download the chosen wordlist, Crackstation’s ‘realuniq’ wordlist file directly to your EC2 instance.This process will also work for retrieving files from any remote server that will allow it to connect.
Wordlists
There are many great, custom and bespoke wordlists out there, but here are a couple of favourites of mine:
- Rockyou.txt. Already in Kali by default!
- Rocktastic. Compiled by myexploit2600. A top bloke and the guy to speak to about Remote Digital SE.
- RealUniq. mentioned above.
That’s enough to get you started!
Hashcat Mask Attacks
In addition to running ‘Brute-force’ attacks using wordlists against password hashes/handshakes, Hashcat can also use ‘Mask’ attacks.
Hashcat defines a mask attack as the following:
Try all combinations from a given keyspace just like in Brute-Force attack, but more specific.
The advantage of using a ‘Mask Attack’ is that we want to reduce the password candidate keyspace to a more efficient one. More information can be found here.
An example of a mask attack against a WPA2 file would look like this:
hashcat -m 2500-a3 <hccapx_file> -1 ?d?l '?d?d?l?d?d?l?d?d?l?d’-w 3
The mask is denoted by:
‘?d?d?l?d?d?l?d?d?l?d’
This represents a 10-character password using numbers and lowercase letters only that run in the following sequence:
12a34b56c7
A great Hashcat reference book can be found on Amazon, titled Hashcrack.
Now you’re good to go…
At this stage your ‘Cloud Cracking station’ is ready to go! Using the information above you can start to put Hashcat to work for either educational or work purposes.
I’ll say this again, this is not a free service and will YOU cost money! Be mindful of how long you use this type of instance and always ‘Stop’ the instance when you have finished using it… If you forget and leave it running, it’s going to get expensive quickly!
Having your own ‘Cloud Cracking Station’ definitely has its advantages, the main two being, no physical equipment to maintain or worry about, access to it anywhere and anytime (if you set it up correctly); however, this comes at a trade off… COST! This type of service, as we have outlined, has a cost associated with it, at the time of writing based on the instance we used, it cost $7.20 per/hour. If you take for example the WPA2 example above, when I ran a mask attack against that type of hash, the estimated time to complete was three (3) days or 72hrs. To put things into context:
72hrs x $7.20 = $518.40
If Hashcat did run for the maximum 72hrs as noted when I ran the initial crack against it, then I would have been charged $518.40
Basically you have to ask yourself if cracking that type of handshake would be worth it! Only you can judge the COST to BENEFIT ratio!!
Note: Since writing this we have came across another series of GPUs available to EC2 instances. So keep an eye out for ‘Cracking in the Cloud with Hashcat Part 2’
Summary
So to round things up, we have covered the following areas:
- How this guide came to be
- AWS registration
- Increasing your AWS instance limit to be able to access the P2 instances
- Selecting an EC2 Instance
- Launching the EC2 Instance
- Connecting to the EC2 Instance
- Updating the Instance
- Setting Up Hashcat to work with the Teslak80 GPUs
- Benchmarking
- Uploading/Downloading files to the instance
- A Brief overview on Wordlists and Mask Attacks
- Summary
Thanks for reading and following along if you did! If you have an comments or feedback then please feel free to use the links in the blog or find me on twitter seceventspen
Cheers!